
Notebooks
A notebook is an interactive document made of cells. You run a code cell and its output appears right under it, and Markdown cells hold your notes. After this chapter you can start a notebook session, run code, keep your work safe with checkpoints, and share a notebook.
Use notebooks to explore data, try a transformation or train a model before you turn the result into a job. Groundzero's notebook editor follows Jupyter habits: command and edit modes, the same keyboard shortcuts, .ipynb import and export, and checkpoints. Each notebook runs in its own session that you start and stop yourself.
Notebooks live in a project, on the Notebooks tab.
| Use a notebook when | Use something else when |
|---|---|
| You want to explore, chart or try ideas interactively | The work should run without you. Use an ETL job |
| You are training or testing a machine learning model | You need a governed table for dashboards. Use a dataset |
Before you start, you need a project, a connection to work with, and a runtime and compute size. Notebooks never run on Standard.
Create a notebook#
- Open a project and select the Notebooks tab.
- Select New Notebook.
- Type a Notebook Name that follows the name rule.
- Select Add.

What happens next: You see Notebook created successfully and the notebook joins the list.
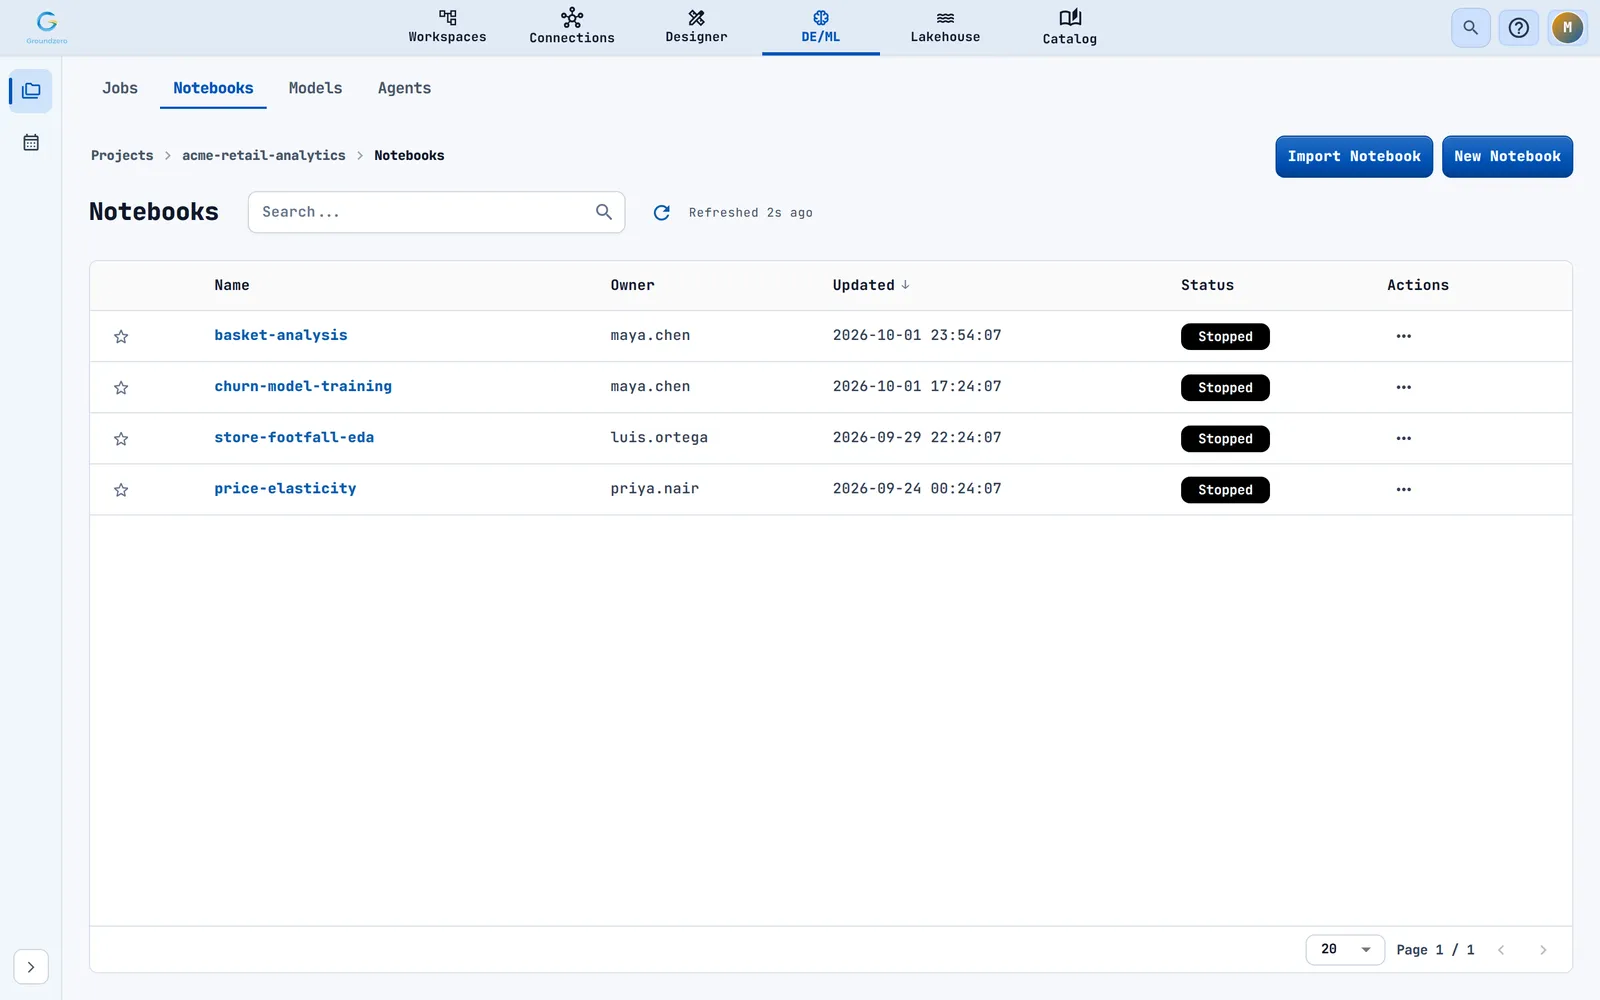
| Column | Meaning |
|---|---|
| Star | Marks a favourite. It is kept in your browser only, so it does not follow you to another browser |
| Name | Select it to open the notebook |
| Owner | The user who last changed the notebook |
| Updated | The time of the last change, in your local time |
| Status | Stopped or Running. The list updates by itself |
| Actions | Delete, Export, Rename and, while running, Stop Notebook |
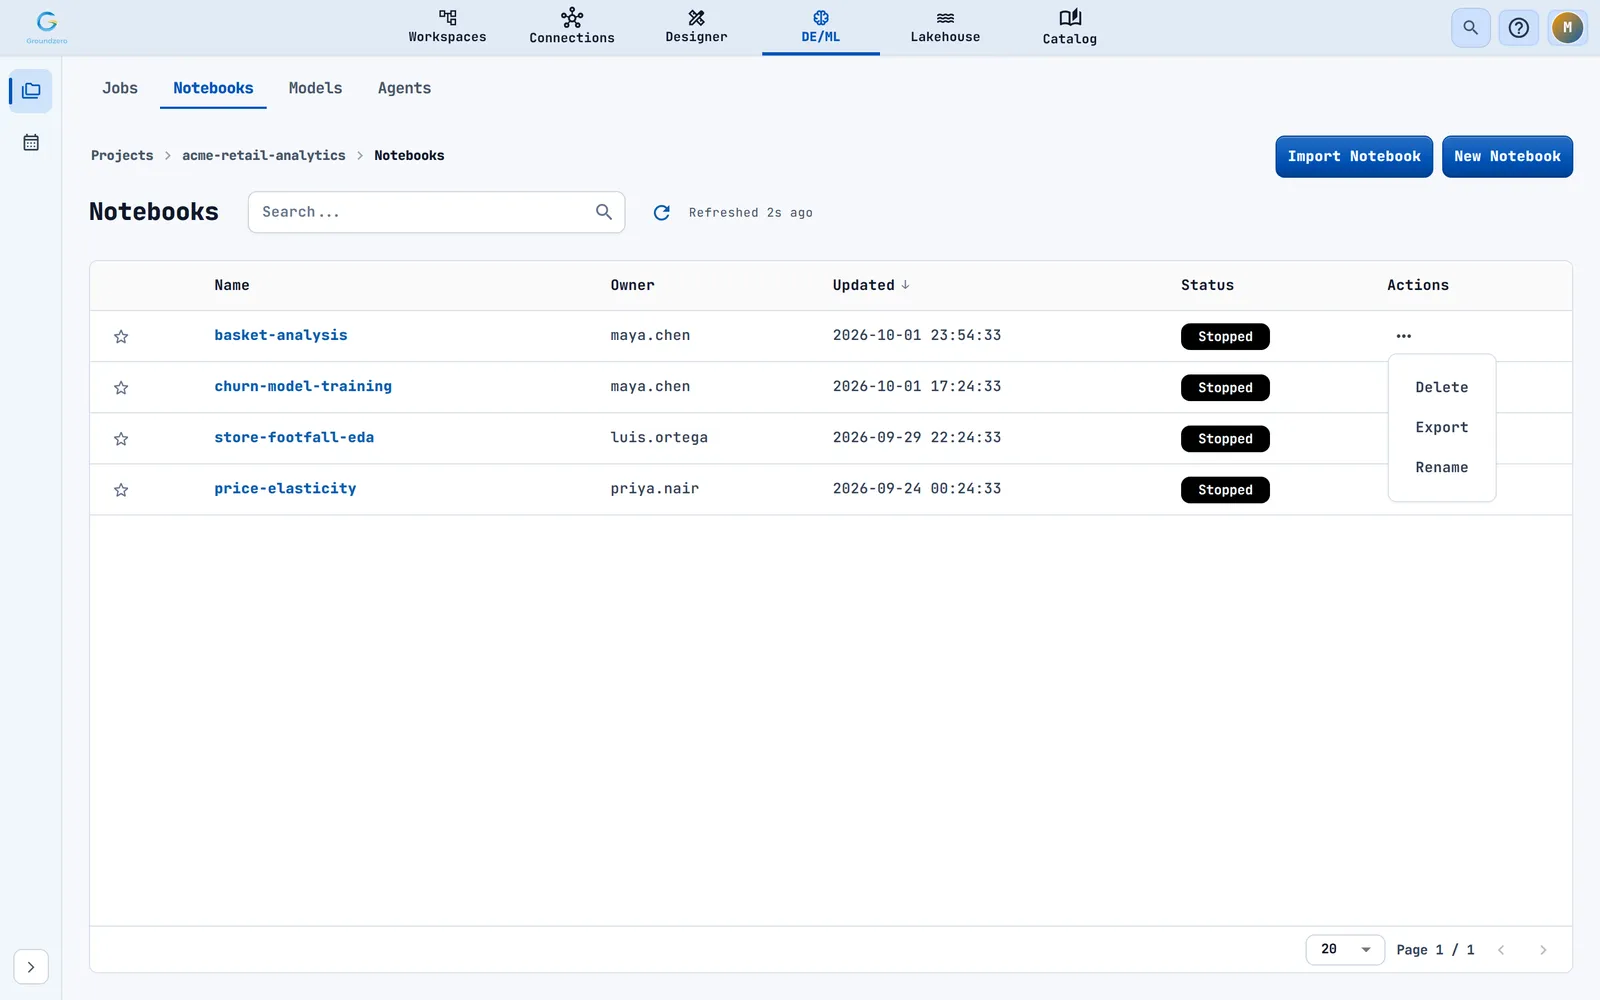
| Action | What it does |
|---|---|
| Rename | Uses the same name rule. You see Notebook renamed successfully |
| Delete | Asks you to confirm. Greyed out while the notebook runs. You see Notebook deleted successfully |
| Export | Publishes a copy. See Share a notebook |
| Stop Notebook | Appears while running. Confirm in the dialog. You see Notebook stopped successfully |
Start a session#
By the end of this task your notebook is running and ready for code.
- Select the notebook name.
- In the left drawer, open Connections and tick the connections you need. Their databases and tables load as a tree.
- In the header, open the runtime picker and choose a Runtime and Compute.
- Select Start session.
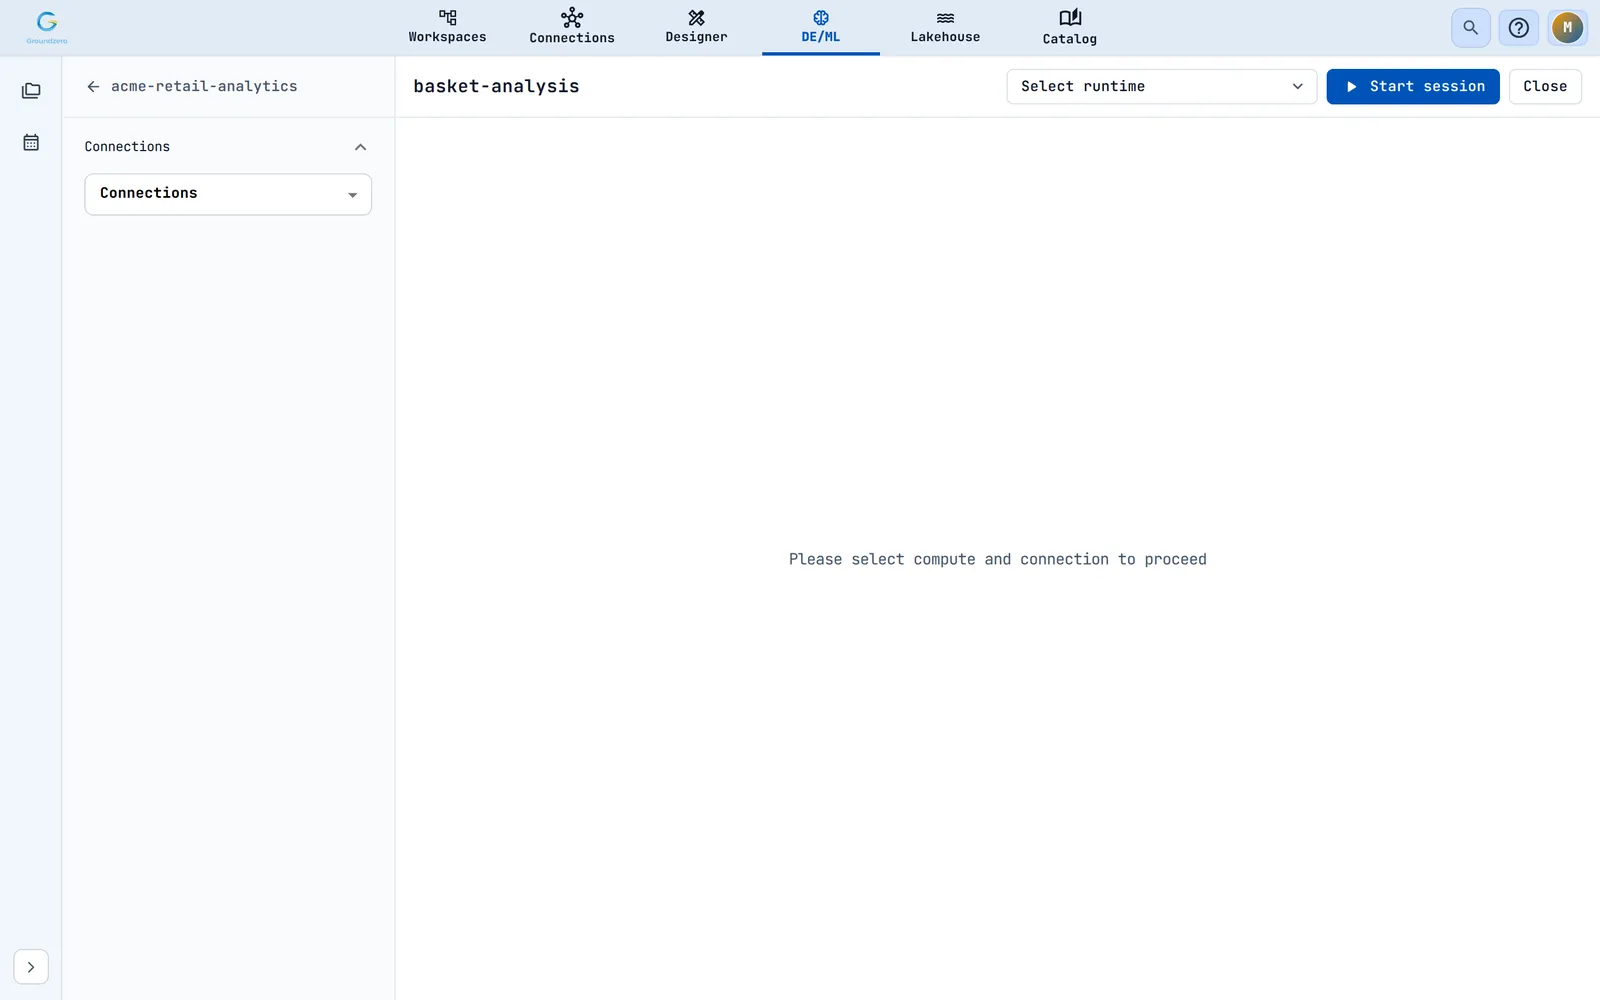
What happens next: The page shows Opening notebook session…, Starting notebook runtime…, Preparing notebook runtime… and Opening notebook workspace…. This usually takes a minute or two. Then the status bar shows the session and kernel (the Python process that runs your cells).
| Message | What it means and what to do |
|---|---|
| Please select connection and Compute | You started without both. Choose them |
| Please select compute and connection to proceed | You have not chosen yet. Choose both |
| Please click on start to start the notebook | Everything is set. Select Start session |
| Notebook is already running, connecting to existing session | You or a colleague already started it. Groundzero reconnects you |
| Notebook session could not be started | The runtime did not become ready. Read the message, then try again or choose a smaller or different runtime |
| Notebook runtime did not become ready | The runtime took too long. Try again |
Note
The runtime picker is locked while a session runs, with the hint Stop the session to change compute. Stop the session, change the runtime and start again.
Stop a session#
Select Stop session in the header, or Stop Notebook in the list. The page reads Notebook session stopped; start the session when you are ready to continue. Stopping ends the kernel, so variables in memory are lost. The saved notebook stays.
Warning
A running session keeps using compute until you stop it. Stop sessions you no longer need.
Run code and read the output#
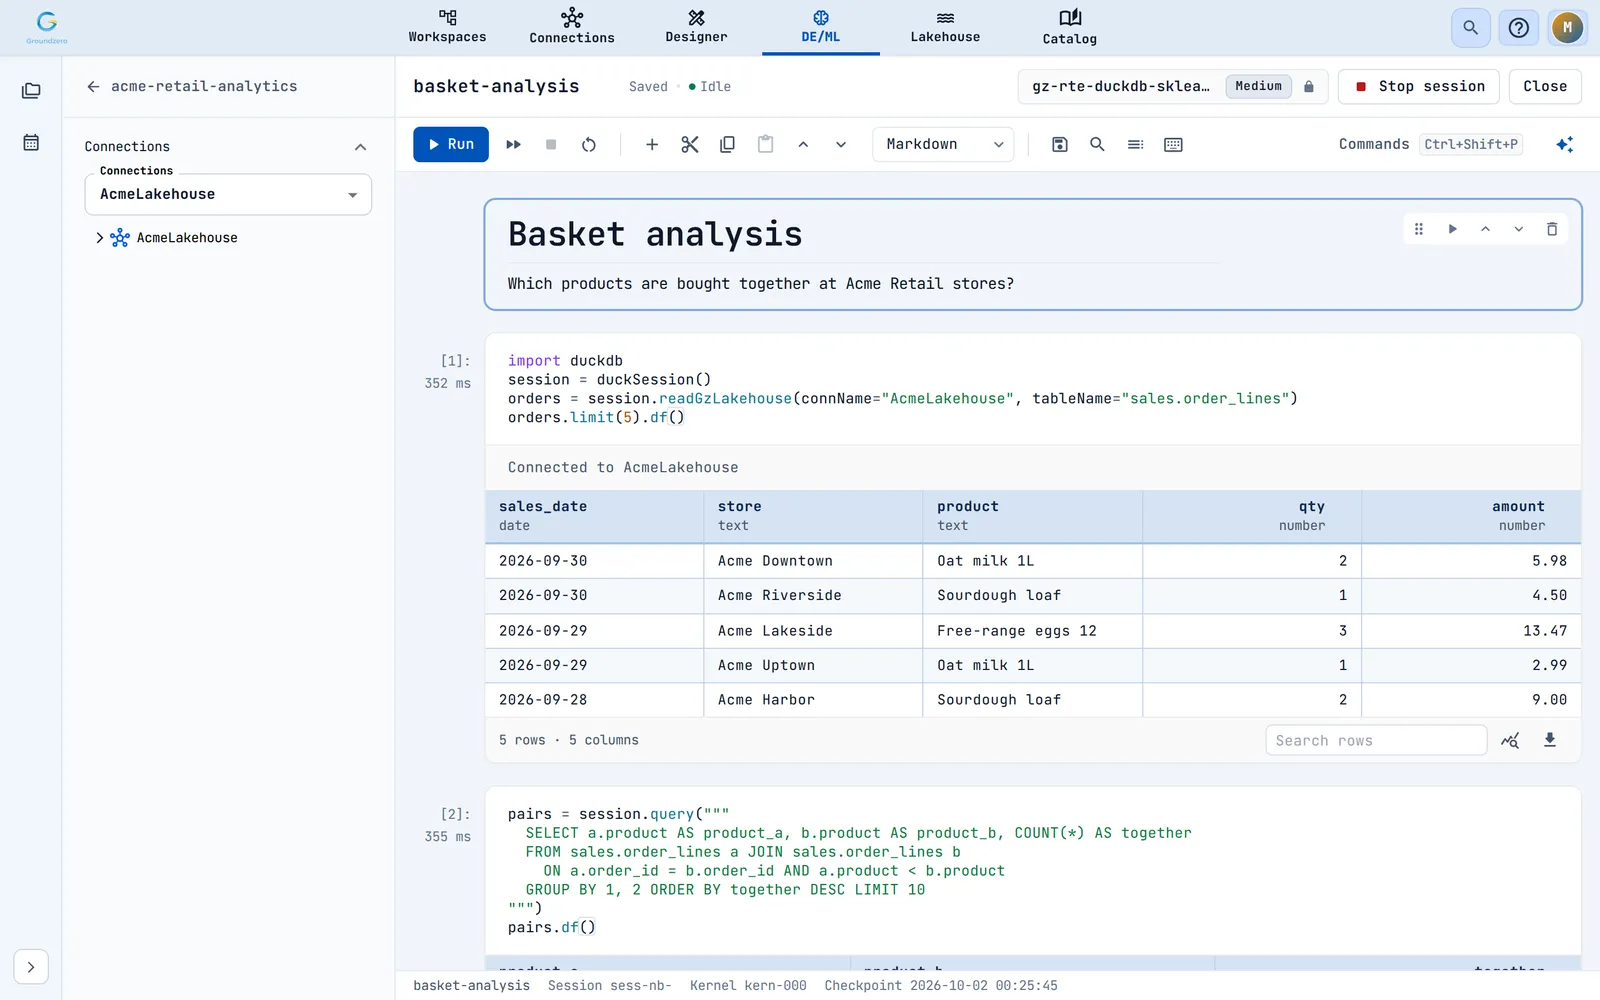
- Click a cell and type code.
- Press Shift+Enter, or select Run.
- Read the output under the cell.

How to check it worked: The kernel state in the header changes from Busy to Idle, and the output appears under the cell.
Code cells run one at a time, in the order you queued them. If a cell fails, or you choose Stop after current cell, the rest of the queue is dropped, and a message says Run stopped at cell N or Run stopped after cell N.
| I want to... | Do this |
|---|---|
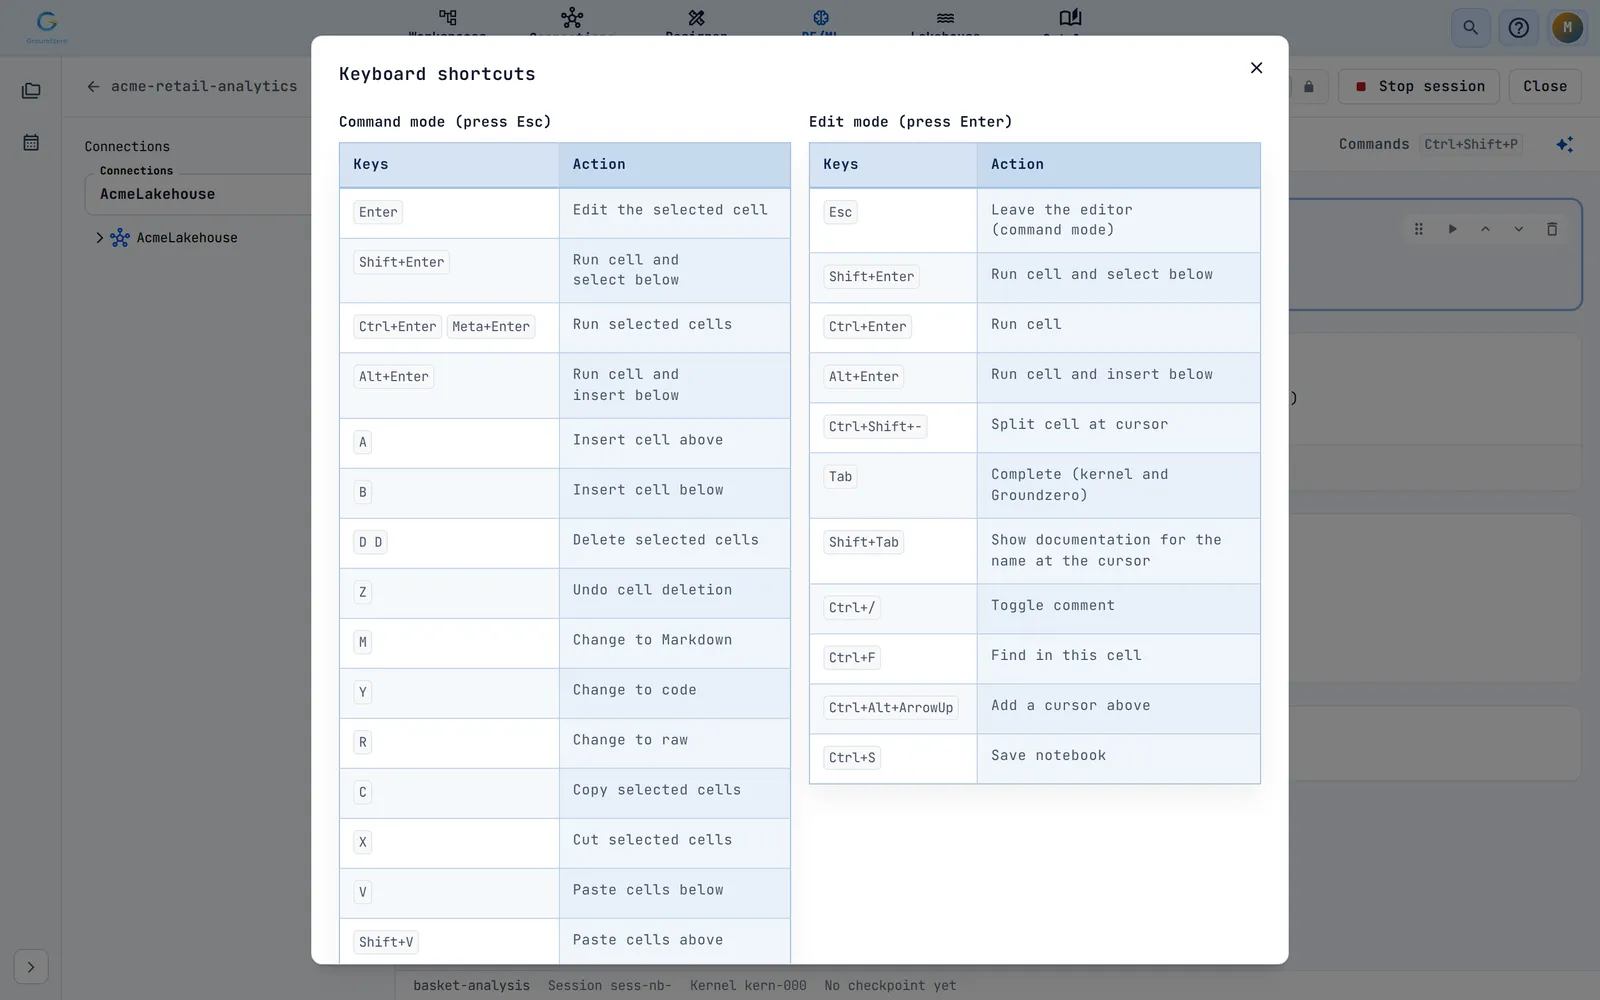
| Run the selected cells | Ctrl+Enter |
| Run and select the cell below | Shift+Enter |
| Run and insert a cell below | Alt+Enter |
| Run every code cell | Run all cells in the toolbar |
| Run all above, or the selected cell and below | Run menu in the command palette |
| Stop after the current cell | Run menu in the command palette |
| Stop a cell that is running | Interrupt kernel (press I twice) |
Run all makes a silent checkpoint first, so you can go back.
What the output can show#
- Text and error output, with colours.
- Markdown and HTML (cleaned for safety), images and JSON trees.
- A data grid under the cell when its last expression is a pandas, Spark or DuckDB frame. The grid shows up to 50,000 rows.
df.head(5),df.limit(100),df.show(20)anddf.take(10)use their own row counts.
The grid footer has the row count, a Search rows box, a column summary and a CSV download. You can sort and filter up to 50,000 rows, and the grid shows 500, 1,000, 2,500 or 5,000 rows per page. If the grid shows fewer rows than your table, the preview is capped, so aggregate or filter in code.
Tip
Add LIMIT to exploratory SQL. Groundzero warns you before an unbounded query: SELECT without LIMIT — large results may be slow. Add LIMIT n. This applies to %%sql cells and to SQL strings in Python such as spark.sql and session.sql.
Use your connections and tables#
The left drawer shows each ticked connection as a tree of databases, tables and columns. Hover over a node for two actions.
| Action | Result |
|---|---|
| Insert notebook snippet (plus icon) | Adds a snippet for that connection, table or column at the cursor |
| Copy name | Copies the name. You see Copied to clipboard |
As you type, the editor suggests connection, database, table and column names, together with the kernel's own suggestions. Press Tab to complete and Shift+Tab for help on the code at the cursor.
Work with cells and modes#
- Command mode (blue bar beside the cell): keys act on cells. Press Enter to edit a cell.
- Edit mode: you type in the cell. Press Esc to go back to command mode.
- Code cells run on the kernel. Markdown cells show text, maths and tables. Raw cells are kept as typed.
- Select several cells with Shift+Up or Shift+Down and act on them together.
- Drag a cell by its handle to reorder it.
Press H in command mode, or select the keyboard icon, to see every shortcut.
The header#
| Element | Meaning |
|---|---|
| Notebook name | Select it to rename in place. Press Enter to save, Esc to cancel |
| Saved / Saving… / Unsaved changes / Save failed | Whether your work is saved. Retry save appears on failure |
| Kernel state | Starting, Idle, Busy, Restarting, Reconnecting, Disconnected or Kernel stopped |
| Runtime picker | Runtime and compute badge. Locked while the session runs |
| Stop session / Start session | Controls the session |
| Close | Returns to the project's Notebooks tab |
The toolbar#
| Control | What it does |
|---|---|
| Run | Runs the selected cells and selects the one below (Shift+Enter) |
| Run all cells | Runs every code cell from the top |
| Interrupt kernel | Stops the running cell (press I twice) |
| Restart kernel | Restarts and clears memory (press 0 twice) |
| Insert, cut, copy, paste, move up, move down | Edit cells |
| Cell type | Code, Markdown or Raw |
| Save, Find and replace, Table of contents, Keyboard shortcuts | Utilities |
| Commands (Ctrl+Shift+P) | Opens the command palette |
Find and replace, and the table of contents#
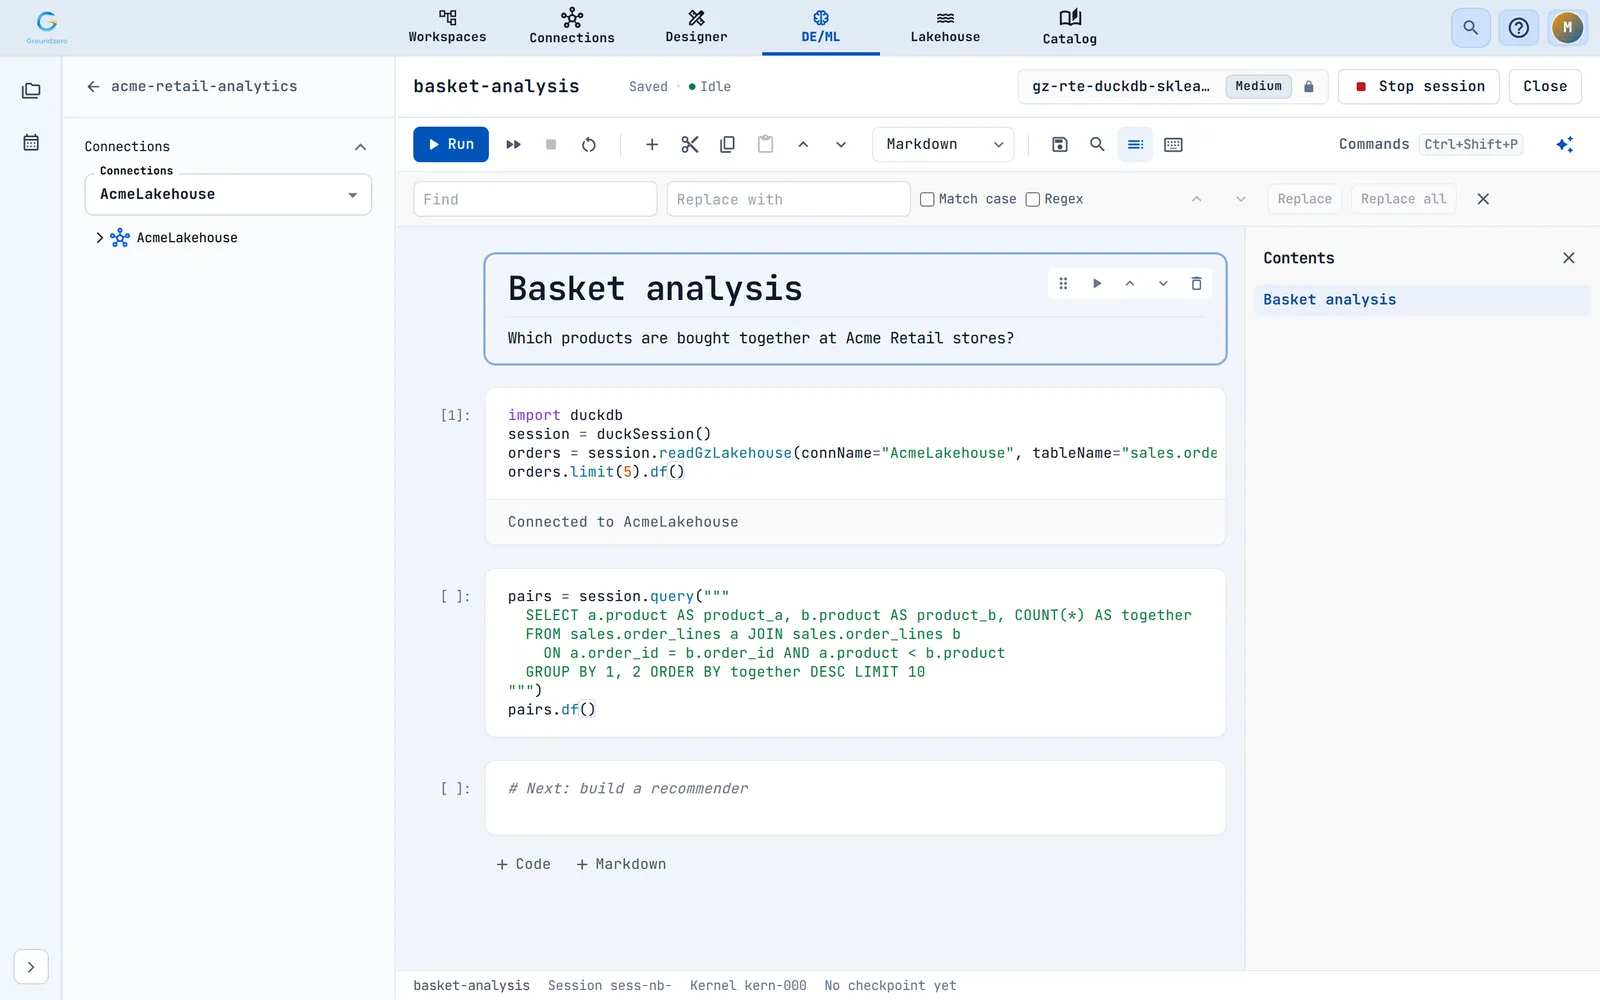
- Find and replace searches all cells. It has Match case and Regex options, and Replace and Replace all.
- Table of contents lists the Markdown headings and jumps to them.
The command palette#
Press Ctrl+Shift+P to search every command.

| Group | Commands |
|---|---|
| Notebook | Save, Create checkpoint, Revert to checkpoint, Import .ipynb file, Download as .ipynb, Trust notebook outputs |
| Edit | Cut, copy, paste above or below, delete, undo delete, split, merge, move, find and replace, clear output, clear all outputs |
| View | Table of contents, line numbers, show or hide input or output, output scrolling, keyboard shortcuts |
| Cell | Insert code or Markdown cell, change type |
| Run | Run variants, stop after current cell |
| Kernel | Interrupt, restart, restart and clear outputs, restart and run all, reconnect |
Keep your work safe#
- Autosave saves the notebook 3 seconds after you stop typing. Press Ctrl+S to save at once. Notebook saved confirms it.
- A checkpoint is a saved restore point. The status bar shows the latest one, for example Checkpoint 2026-10-02 00:10:04, or No checkpoint yet.
- Choose Create checkpoint to make one, and Revert to checkpoint to go back to the latest.
Confirmations you may see#
| Command | What the dialog says |
|---|---|
| Restart kernel | Every variable in memory is lost. Cell outputs stay in the notebook. |
| Restart and clear outputs | Every variable in memory and every cell output is lost. |
| Restart and run all | Every variable in memory is lost, then all code cells run from the top. |
| Revert to checkpoint | Every change made after that checkpoint is lost, including saved changes. |
Import a .ipynb file |
The cells of this notebook are replaced by the N cells in file… Download the current notebook first |
If the connection to the kernel drops, the editor tries again a few times, then shows Disconnected. Choose Reconnect to kernel. A cell that was running shows The kernel connection was lost. If the editor cannot open a notebook, it shows Unable to open notebook with the hint Check that the notebook session is running, then try again and a Try again button.
Move notebooks in and out#
- Download as .ipynb saves the notebook to your computer.
- Import .ipynb file replaces the cells of the open notebook. Imported outputs stay untrusted until you choose Trust notebook outputs.
Share a notebook#
Notebooks have no share link. Share them in one of two ways.
- Publish and import. Choose Export on the Notebooks list to publish a copy to your site. Anyone on the site can then choose Import Notebook to add a copy to their own project.
- Permissions. Administrators decide who can see and edit notebooks and projects.

| Step | What you see |
|---|---|
| Export | name exported successfully |
| Export again with the same name | The dialog Overwrite Export Notebook. Choose to replace it |
| Import | Notebook name imported successfully |
| Import a name that already exists in the project | The dialog Notebook Name Conflict, with Replace (Notebook name replaced successfully) or Keep Both (… kept and new notebook imported successfully) |
Administrators can list, import across sites and delete published notebooks in the admin console.
Troubleshooting#
| Symptom | Cause | Fix |
|---|---|---|
| Unable to open notebook | The session is not running or cannot be reached | Start the session, then select Try again |
| Save failed | The notebook could not be saved | Select Retry save. Copy your work if it keeps failing |
| A cell says The kernel is not connected yet. | The kernel is still connecting | Wait a moment and run again |
| The output grid shows fewer rows than the table | The preview is capped at 50,000 rows | Aggregate or filter in code |
| A variable you defined is gone | The kernel restarted | Run the cells again |